I am one of those people who has been blessed... not with one, not with two, but with three sisters! One of my sisters requested mittens that can be used for texting so I took this pattern
http://www.crochetandknitting.com/mitglov2.htm
and only altered the thumbs so that there would be a slit to pull the thumbs out so they can be used for texting as well. :)
There is a shop I found on etsy that that sells this same glove (except the thumb opening) so if you love it and can't make it visit her shop. Her stitches look really pretty.
http://www.etsy.com/listing/76537017/convertible-fingerless-gloves-or-mittens
I am still in GA patiently waiting for the big move. Crocheting sure is a great way to relieve the stress of moving! If you have a great pattern or pictures of texting/fingerless gloves you have made share it by leaving me a comment :)
Yea, I am hooked... on hand carved stamps, crochet, paper crafts, letter boxing, and anything else I take a crafty interest in :-) This is the theme of my blog... I am hooked! :-)
Saturday, November 19, 2011
Thursday, November 17, 2011
My fall fingernail design
The leaves are changing their color here in South Georgia and I wanted my manicure to have color changes too :)
This manicure is made by using these three colors: Finger Paints Artists Inspiration, Finger Paints Cordur Orange, and China Glaze Twenty-Four K . I started at the base of the nail with the gold color and used an eye shadow applicator to "sponge" it on. I followed with the light brown blending with the applicator and finished with the orange, again using the applicator to sponge the colors and blend them together at the edges. I then applied a top coat. Next, I used BM21 plate with Konad special polish in black. Finally, I applied another top coat and the result is a pretty fall manicure :)
Feel free to ask any questions about this manicure, and let me know what you think.
This is the eye shadow applicator I used |
Tuesday, November 15, 2011
A link to some of the actual wedding pictures
Not sure if this will work but here is a link to the photographer's face book page. She is only 19 years old!! She is such a talented young lady and I have been blessed to know her for many years now and have watched her God given talent bloom. I am attaching a link to her blog as well.
Let me know what you think :)
http://www.facebook.com/pages/Mixon-Match-Photography/220990754634027?sk=info#!/media/set/?set=a.230519053681197.59099.220990754634027&type=1
(North Wedding)
Also, her blog address is http://mixonmatch.blogspot.com/
Let me know what you think :)
http://www.facebook.com/pages/Mixon-Match-Photography/220990754634027?sk=info#!/media/set/?set=a.230519053681197.59099.220990754634027&type=1
(North Wedding)
Also, her blog address is http://mixonmatch.blogspot.com/
Rustic wedding decor, a few pics of what I made
![]() |
I made 6 different rectangular saying that were placed int the center of swags made of twigs. They were used in the chapel at the windows. |
![]() |
I also added a few of the same flowers that I used in the bouquets with the twigs. |
![]() |
This little chapel is located in the most adorable country place, so I added a few decorative items to the entrance of the chapel... it actually is surrounded by a picket fence, how cute is that!! |
![]() |
This cake was so perfect!! I made the cake topper by drawing out a tree design and transferring it over to a wooden heart that I cut out, then.... I took out my handy wood burning tool again :) |
Let me know what you think!!
Saturday, October 29, 2011
2 Week Count Down to Wedding
Here we go!!!! Just two weeks from today and my adopted daughter is getting married!! Then two weeks later we move!!!! YIKES
I am really nervous about doing this BUT... I am putting my etsy shop in vacation mode!!! Starting on Nov. 2nd!! It will most likely be in vacation mode until the end of December so if you would like to make a purchase be sure to do it before Nov. 2nd.
I hope this will not effect my shop the way others have said it would... biting finger nails on this one :-/
I am so happy with the amount of orders I have had and have been blessed with wonderful customers :)
I am sill going to keep up with my blog, so be sure to keep following me :))
Here are a few more things I have made for the wedding... take a look...
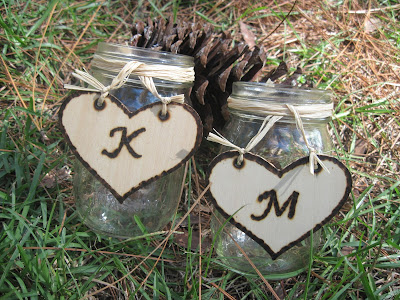
I think I have mentioned that the wedding is a rustic country theme, for these cute mason jars I took out my handy wood burning tool to monogram these wooden hearts.... love it :) |
Friday, October 28, 2011
I am hooked on nail art! My newest design...
My daughter and I took a little trip to the local Rite Aid last week and whooohoooo we found a LOAD of nail polishes 50% off or more!! I found the coolest black glitter polish along with other fun colors! We had a great time playing with all of the colors and this was one of the designs I came up with, let me know what you think :)
Friday, October 21, 2011
I finally updated my etsy banner
When I first opened my etsy shop I made a very simple generic banner. I have always admired others banners and the way they used pictures of their merchandise in the banner. I would wonder how they did it. Well, yesterday I decided to google how to make an etsy banner.... and I yipeeee I found out about gimp and read through detailed how to instructions!! I worked for several hours last night, made a few, deleted a few and learned a lot. This is the banner I ended up creating :) It may still be simple, but I am soooo excited that is has some pictures of my stamps in it!!
Subscribe to:
Posts (Atom)